
High Quality & Great Pricing l # Plates from $29 l Dirt Bike Kits $175 l Stickers 12 @ $9
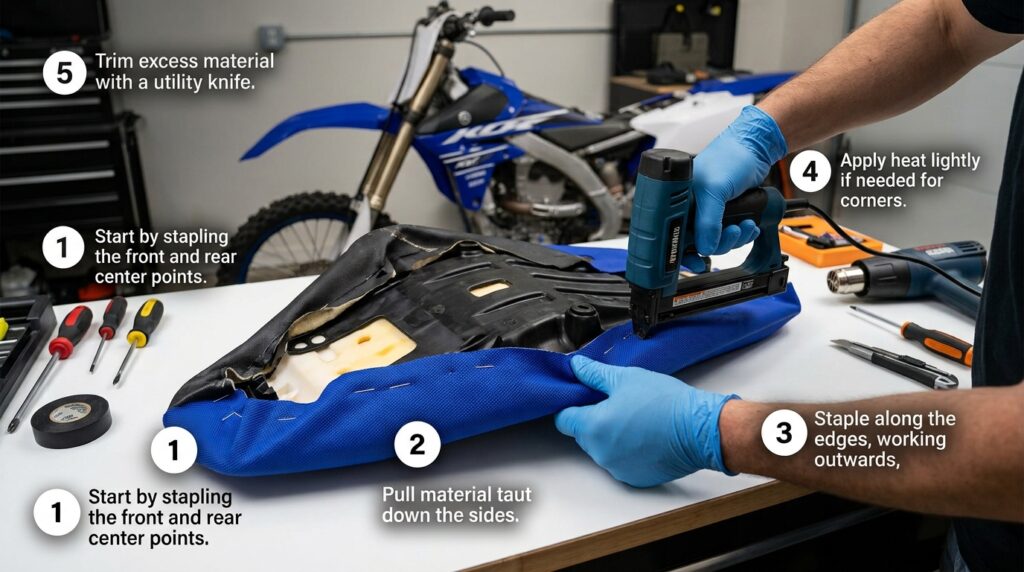
A fresh seat cover can dramatically improve the appearance and feel of a dirt bike. Whether your existing cover is worn, torn, slippery, or simply outdated, installing a replacement can give the motorcycle a cleaner and more race-ready appearance. With the right tools and a little patience, many riders can complete the job at home.
If you’re also planning to refresh your bike’s appearance, visit Boondocks Decals for custom dirt bike graphics and vinyl decal kits. This How to Install a Dirt Bike Seat Cover: Easy 5-Step Guide explains the process from removing the old cover to securing the new one.
Before following How to Install a Dirt Bike Seat Cover: Easy 5-Step Guide, it helps to understand why riders replace seat covers.
A seat cover can improve grip, refresh the motorcycle’s appearance, and replace material that has become cracked or damaged. Ribbed or textured covers can also provide additional traction between the rider and seat, which can be useful during aggressive riding and motocross racing.
A new cover is also an easy way to coordinate the seat with custom dirt bike graphics, race numbers, and riding gear.
The first step in How to Install a Dirt Bike Seat Cover: Easy 5-Step Guide is gathering your tools.
Depending on the motorcycle and seat construction, you may need:
Use staples that are appropriate for your seat base. If you’re unsure about the correct size, check the seat manufacturer’s recommendations or compare them with the original staples.
The first practical step in How to Install a Dirt Bike Seat Cover: Easy 5-Step Guide is removing the seat from the motorcycle.
Remove the seat according to your motorcycle manufacturer’s instructions. Once the seat is off, place it on a clean work surface.
Use a staple remover, flat screwdriver, and pliers to carefully remove the staples holding the old cover in place. Take your time because forcing staples out can damage the seat base.
Once all staples are removed, take off the old cover and inspect the foam underneath.
This is a good opportunity to check for damaged, compressed, or deteriorated foam. If the foam is badly damaged, replacing the cover alone may not solve the problem.
Make sure the seat base and foam are clean before moving forward.
Correct positioning is one of the most important parts of How to Install a Dirt Bike Seat Cover: Easy 5-Step Guide.
Place the new cover over the seat without fastening it immediately. Align the center of the cover with the center of the seat.
If the cover has ribs, logos, graphics, or other directional details, make sure they are centered correctly.
Pull the cover gently over the seat and check that there is enough material on every side to reach the underside.
Don’t staple anything until you’re satisfied with the overall alignment.
Once the cover is positioned correctly, begin fastening it.
The third step in How to Install a Dirt Bike Seat Cover: Easy 5-Step Guide is to start at the center of one side and place a staple underneath the seat base.
Then move to the opposite side and pull the material evenly before adding another staple. Continue alternating sides so tension remains balanced.
Next, work toward the front and rear of the seat.
The goal is to distribute tension evenly rather than pulling one side extremely tight before working on the other.
As you work, regularly check the top of the seat. The cover should remain smooth without large wrinkles or folds.
If you notice a wrinkle, remove the nearby staple, adjust the material, and reinstall it. Fixing problems early is much easier than trying to correct them after the entire cover has been secured.
Corners and curved sections are usually the most challenging part of How to Install a Dirt Bike Seat Cover: Easy 5-Step Guide.
Use controlled tension to pull the material around the shape of the seat. A heat gun or hair dryer can sometimes make the material more flexible, but use heat carefully.
Avoid excessive heat because it can damage some seat-cover materials.
Fold excess material underneath the seat neatly and secure it with additional staples. Trim unnecessary material only after you’re confident that the cover is properly positioned.
The finished surface should be tight and smooth without excessive wrinkles.
The final step in How to Install a Dirt Bike Seat Cover: Easy 5-Step Guide is inspection.
Turn the seat over and check that all staples are secure. Make sure no sharp staple ends are sticking out in areas where they could cause problems.
Then inspect the top of the seat from multiple angles. Look for wrinkles, uneven tension, shifted graphics, or areas that aren’t properly secured.
Once everything looks correct, reinstall the seat on your motorcycle and make sure it is securely mounted according to the manufacturer’s instructions.
The How to Install a Dirt Bike Seat Cover: Easy 5-Step Guide is only part of the process. Choosing a suitable cover is equally important.
Consider the material, texture, rib pattern, durability, fitment, and intended riding conditions.
Riders involved in motocross racing may prefer aggressive ribbing for additional grip, while trail riders may want a texture that provides traction without making it difficult to move around the seat.
Always verify the exact motorcycle model and year before purchasing.
Seat shapes can vary between different motorcycle models and generations.
Whether you ride a KTM, Yamaha, Honda CRF, Kawasaki KX, or Suzuki RMZ, model-specific fitment is important when ordering a replacement cover.
A properly fitted cover is easier to install and can provide a cleaner final appearance.
You can also coordinate your new seat cover with your motorcycle’s overall graphics design.
Start Your Graphics with Boondocks Decals to explore custom dirt bike graphics and vinyl decal kits.
When following How to Install a Dirt Bike Seat Cover: Easy 5-Step Guide, avoid these common mistakes:
Taking your time can make the installation significantly easier.
A new seat cover can be even more effective when combined with fresh dirt bike graphics.
A coordinated design can match your seat, number plates, shrouds, fenders, and other panels. Quality vinyl decal kits can create a consistent race-inspired appearance across the motorcycle.
Whether your bike is a KTM, Yamaha, Honda CRF, Kawasaki KX, or Suzuki RMZ, custom graphics can help transform the overall look.
After completing How to Install a Dirt Bike Seat Cover: Easy 5-Step Guide, give the cover some basic care.
Remove mud and dirt after riding and use a suitable cleaning method for the cover material. Avoid harsh chemicals that could damage the surface.
Inspect the seams and edges periodically, especially if you frequently ride in demanding conditions.
Keeping the seat clean can also help maintain consistent grip and appearance.
Learning How to Install a Dirt Bike Seat Cover: Easy 5-Step Guide can help you refresh your motorcycle without needing a complicated installation process. The key is careful preparation, accurate positioning, balanced tension, and secure stapling.
Whether you’re riding a KTM, Yamaha, Honda CRF, Kawasaki KX, or Suzuki RMZ, a properly installed seat cover can improve the appearance and riding experience.
Pair your new seat cover with custom dirt bike graphics and durable vinyl decal kits from Boondocks Decals for a complete race-inspired transformation.
Ready to give your dirt bike a new look? Contact Boondocks Decals today and start creating a custom graphics package designed around your motorcycle.