
High Quality & Great Pricing l # Plates from $29 l Dirt Bike Kits $175 l Stickers 12 @ $9
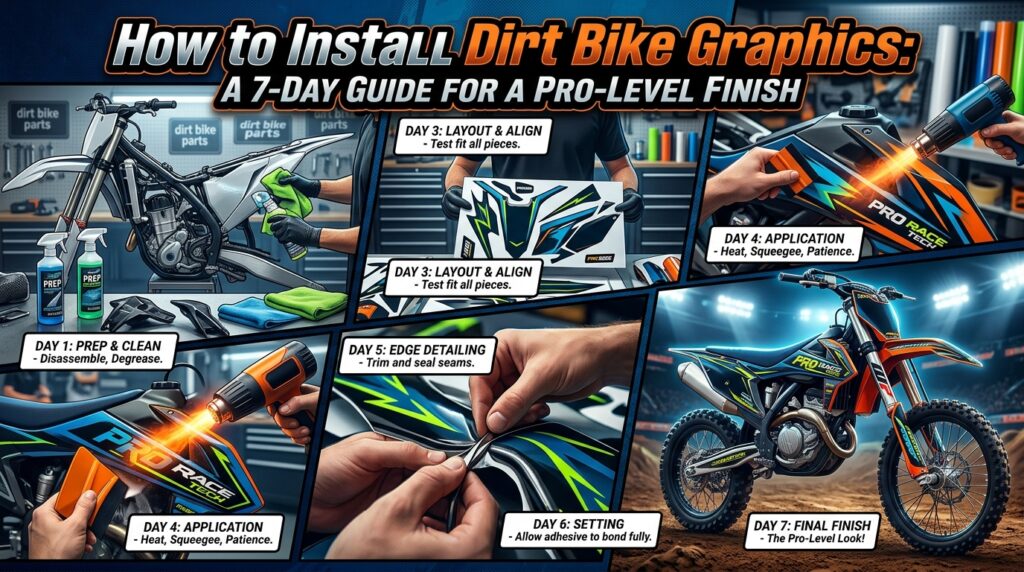
Installing new graphics can completely transform the appearance of your motorcycle while adding another layer of protection to the plastics. Whether you ride a KTM, Yamaha, Honda CRF, Kawasaki KX, or Suzuki RMZ, properly installed decals can make your bike look race-ready. How to Install Dirt Bike Graphics: A 7-Day Guide for a Pro-Level Finish
If you’re planning a graphics upgrade, explore Boondocks Decals for custom dirt bike graphics and professional-quality vinyl decal kits. This How to Install Dirt Bike Graphics: A 7-Day Guide will walk you through the process from preparation to final inspection.
A graphics kit is more than just a visual upgrade. Quality dirt bike graphics can help protect plastic surfaces from scratches, dirt, and everyday wear caused by riding conditions. However, even premium decals can look poor if they are installed incorrectly.
Understanding How to Install Dirt Bike Graphics: A 7-Day Guide gives riders enough time to prepare the bike, clean the plastics, position each decal correctly, and make adjustments before the final finish.
For motocross racing, trail riding, practice days, and bike builds, properly installed graphics provide a clean and professional appearance.
The first step in How to Install Dirt Bike Graphics: A 7-Day Guide is selecting a kit designed specifically for your motorcycle.
Every bike has different plastic shapes, curves, vents, and panel dimensions. A graphics kit made for a KTM 65 SX, for example, may not fit a different model even if the bikes appear similar.
Look for graphics designed specifically for your bike’s:
If you want a custom design, Start Your Graphics with Boondocks Decals to explore personalized options.
Preparation is one of the most important parts of How to Install Dirt Bike Graphics: A 7-Day Guide.
Remove old stickers and decals carefully. Any remaining adhesive should be cleaned from the plastics before installation. Wash the bike thoroughly, paying particular attention to the areas where the vinyl decal kits will be applied.
Avoid applying graphics over:
After cleaning, allow the plastics to dry completely. A clean and dry surface gives the adhesive the best opportunity to bond properly.
Before starting, organize everything you need. Having the right tools nearby makes How to Install Dirt Bike Graphics: A 7-Day Guide much easier to follow.
Useful installation supplies include a clean microfiber cloth, plastic-safe cleaner, a squeegee, masking tape, a sharp trimming tool, and a heat gun or hair dryer.
Work in a clean environment with a comfortable temperature. Extremely cold conditions can make vinyl less flexible, while excessive heat can make positioning more difficult.
Now comes the exciting part of How to Install Dirt Bike Graphics: A 7-Day Guide: applying the decals.
Begin with one of the larger, flatter panels. Do not immediately press the entire decal onto the surface. First, position it carefully and use small sections to control the installation.
Start from the center or another stable reference point and gradually work toward the edges. Use your squeegee to push out air and prevent wrinkles.
For curved sections, gently warm the vinyl so it becomes more flexible. Avoid stretching it excessively because overstretched material can shrink back later.
Take your time. A slow installation usually produces a better result than trying to finish the entire bike quickly.
Curves and edges are where many installations become challenging. This is why How to Install Dirt Bike Graphics: A 7-Day Guide emphasizes patience.
When working around shrouds, fenders, number plates, and other curved surfaces, apply the vinyl gradually. Use controlled heat when necessary and smooth the material with your fingers or squeegee.
Never force a wrinkle flat by aggressively stretching the decal. Instead, gently lift the affected section, warm the vinyl slightly, and reposition it.
Pay close attention to edges. Properly seated edges help create a cleaner appearance and reduce the chance of premature lifting.
By Day 6, your dirt bike should be almost complete. This stage of How to Install Dirt Bike Graphics: A 7-Day Guide focuses on inspection.
Look closely at every panel and check for:
Small bubbles can often be worked toward an edge with a squeegee. If a section is misaligned, carefully lift and reposition it rather than forcing it into place.
For riders participating in motocross racing, this final inspection is especially useful because graphics need to withstand dust, mud, pressure washing, and repeated riding.
The final step in How to Install Dirt Bike Graphics: A 7-Day Guide is allowing the adhesive to properly settle.
Avoid immediately exposing newly installed graphics to aggressive washing or harsh conditions. Give the adhesive time to establish a strong bond with the plastic surface.
After the graphics have settled, inspect the bike one more time. Clean any installation residue and make sure all edges are firmly attached.
The result should be a clean, professional-looking bike that is ready for the track, trails, or your next riding adventure.
A few simple techniques can make How to Install Dirt Bike Graphics: A 7-Day Guide much easier:
Take your time: Rushing is one of the easiest ways to create wrinkles or misalignment.
Work panel by panel: Completing one section before moving to another helps maintain consistency.
Use controlled heat: Gentle heat improves flexibility, especially around curves.
Keep surfaces clean: Dirt and oil underneath vinyl can reduce adhesion.
Check alignment before pressing: Once firmly applied, repositioning becomes more difficult.
Quality materials also matter. Well-made dirt bike graphics and vinyl decal kits are designed to provide durability while maintaining strong visual impact.
A fresh graphics kit can give an older bike a completely new personality. From bold KTM-inspired race designs to Yamaha, Honda CRF, Kawasaki KX, and Suzuki RMZ graphics, riders have countless ways to personalize their machines.
Following How to Install Dirt Bike Graphics: A 7-Day Guide helps you approach the installation methodically instead of trying to complete everything in a single rushed session.
Whether you’re preparing for motocross racing, building a show bike, or simply refreshing your ride, professional-looking graphics start with good preparation and careful installation.
Learning How to Install Dirt Bike Graphics: A 7-Day Guide can save time, reduce installation mistakes, and help you achieve a cleaner finish. From choosing the correct kit and preparing your plastics to carefully applying curved sections and allowing the adhesive to settle, every step contributes to the final result.
If you want professionally designed custom dirt bike graphics without compromising on fit, style, or quality, check out Boondocks Decals.
Ready to create your next custom graphics kit? Contact Boondocks Decals today and start designing a look that makes your bike stand out on the track and trails.