High Quality & Great Pricing l # Plates from $29 l Dirt Bike Kits $175 l Stickers 12 @ $9
How to remove old graphics from dirt bike is one of the first questions riders ask before installing fresh dirt bike graphics, custom motocross decals, or a full vinyl decal kit. Whether you ride a KTM, Yamaha, Honda CRF, Kawasaki KX, Suzuki RMZ, or another motocross machine, removing old decals the right way helps protect your plastics and prepares the surface for a cleaner new install.
If you are planning to refresh your bike’s look, how to remove old graphics from dirt bike starts with patience, heat, adhesive cleanup, and proper surface preparation. After that, you can move into new custom graphics with a smoother finish.
How to remove old graphics from dirt bike means safely peeling off worn, faded, cracked, or outdated vinyl decals from dirt bike plastics without scratching, bending, or damaging the panels. It also includes removing leftover glue before installing new motocross sticker kits.
In simple terms, how to remove old graphics from dirt bike is the process of using controlled heat, slow peeling, adhesive remover, and cleaning steps to prepare your bike for new race bike graphics.
This step matters because old glue and dirty plastics can stop new vinyl decal kits from sticking correctly.
Riders remove old graphics when the bike looks faded, sponsors change, race numbers change, or a new custom design is ready. However, rushing the job can damage plastics and create more work later.
Proper removal helps with:
Many riders searching for “Best dirt bike graphics for racing” forget that the final result depends heavily on prep work. Therefore, learning how to remove old graphics from dirt bike is just as important as choosing the new design.
Before you begin, gather the right tools. This keeps the process safer and smoother.
You may need:
Avoid metal blades when possible. They can scratch plastics, especially around curves, shrouds, and number plates. Also, do not use harsh chemicals unless you know they are safe for motorcycle plastics.
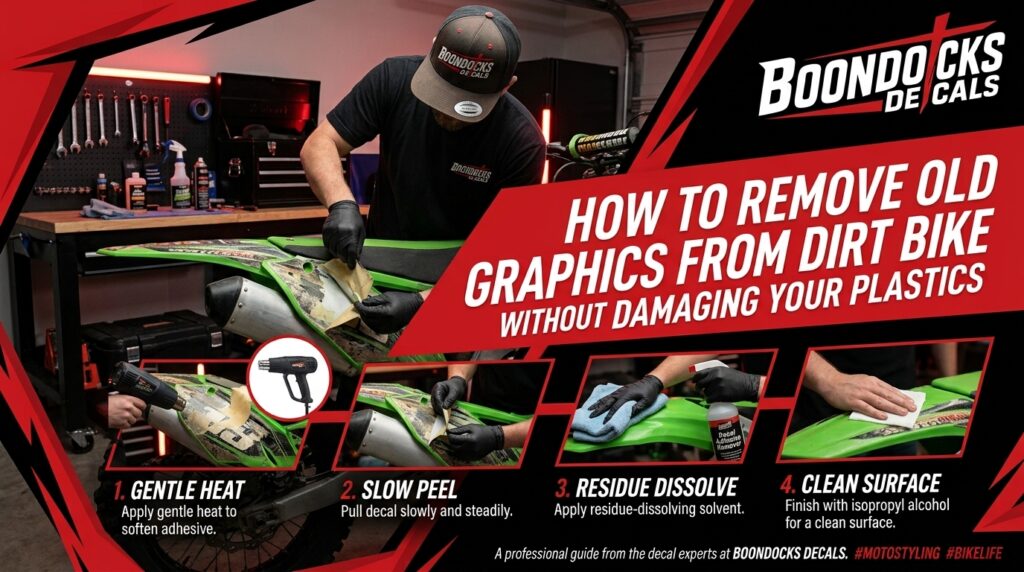
The safest method is slow and controlled. Start by washing the bike plastics to remove mud, oil, and dust. Then dry everything completely before applying heat.
Warm one corner of the decal with a hair dryer or heat gun on low to medium heat. Once the adhesive softens, lift the edge with your fingers or a plastic scraper. Then pull the decal back slowly at a low angle.
Do not yank the vinyl straight up. Instead, pull it back over itself. This reduces stress on the plastic and helps the adhesive release more evenly.
For large shrouds or side panels, work in sections. Add heat as needed, but do not overheat one spot. If the vinyl starts tearing, slow down and warm the area again.
This is the core method for how to remove old graphics from dirt bike without creating deep scratches or sticky residue problems.
After the graphics come off, leftover glue is normal. Older motocross decal kits often leave adhesive behind, especially if they were exposed to sunlight, mud, pressure washing, or years of riding.
Apply a plastic-safe adhesive remover to a microfiber cloth. Then gently rub the sticky area until the glue begins to lift. Work slowly because aggressive rubbing can dull the plastic surface.
After the glue is gone, wash the panel again with mild soap and water. Then wipe it with isopropyl alcohol to remove oils before installing new custom dirt bike graphics.
If you are planning to order how to remove old graphics from dirt bike replacement kits or new motocross branding kits, clean plastics will help the new decals bond better.
One common mistake is using too much heat. Excessive heat can warp plastics, stretch vinyl, or make the adhesive messy. Use controlled heat and keep the tool moving.
Another mistake is using a sharp metal scraper. Although it may remove vinyl quickly, it can leave scratches that show through new dirt bike graphics.
Avoid these mistakes:
Also, do not install new graphics immediately after using oily adhesive remover. The surface must be fully clean and dry first.
Thick and thin motocross vinyl behave differently during removal. Thick vinyl is usually more durable and may peel off in larger pieces. However, if it is old and dry, it can still crack.
Thin vinyl may remove faster, but it can tear into small pieces and leave more adhesive behind. Because of that, premium motocross-grade vinyl materials are better for both performance and long-term maintenance.
This is why riders should choose quality vinyl decal kits when installing new race bike graphics. Better materials can improve durability, professional printing quality, and removal experience later.
If you want a cleaner result, prepare the bike like a professional installer. Good prep makes a major difference, especially on KTM, Yamaha, Honda CRF, Kawasaki KX, and Suzuki RMZ plastics with curves and edges.
Use these pro tips:
Also, if you are updating rider names, race numbers, sponsor logos, or personalized colors, review your design before printing. This helps avoid mistakes and gives your bike a stronger race-ready look.
Once you understand how to remove old graphics from dirt bike, the next step is choosing a better replacement kit. Premium materials, air-release technology, UV-resistant print, rider-focused design, and precision-cut fitment all help create a cleaner install.
Quality graphics can support:
Riders often ask, “What are the best motocross sponsor decals?” The best motocross sponsor decals use strong vinyl, sharp print quality, readable race numbers, and clean sponsor placement.
Likewise, riders ask, “How to choose motocross sponsor decals?” Start with your bike model, sponsor logos, race number, riding style, and preferred finish. Then choose a design that looks clear from a distance.
Fresh motocross sponsor decals do more than cover plastics. They help riders build identity. A clean kit can make your bike look more professional in the pits, on the track, and in photos.
Custom graphics can include:
For riders searching “Custom motocross sponsor decals near me,” online custom design can be a better option because it gives more control over style and fitment. With how to remove old graphics from dirt bike planning and custom design, your bike can look fresh, polished, and ready for the next ride.
After removing old graphics, a fresh kit can improve both appearance and branding. This is especially useful for riders who race, practice, promote sponsors, or create motocross content.
Best uses include:
“Best dirt bike graphics for racing” usually means graphics that combine durability, style, and readable branding. So, the removal process and the new kit both matter.
If your old decals are faded, peeling, or outdated, now is a good time to plan a new look. After learning how to remove old graphics from dirt bike, you can start fresh with custom dirt bike graphics, motocross sticker kits, motocross vinyl wraps, and full rider customization.
To create your next design, visit Boondocks Decals or start your custom graphics process here: https://org.boondocksdecals.com/start-your-graphics/.
Boondocks Decals helps riders build custom graphics with names, numbers, sponsor logos, and colors that match their bike and riding style.
The easiest way is to warm the decal with a hair dryer or heat gun, lift one corner, and peel slowly at a low angle. Then remove leftover adhesive with a plastic-safe cleaner.
No, new dirt bike graphics should not be installed over old adhesive. Leftover glue can cause bubbling, weak bonding, and uneven surfaces. Always clean the plastics before installing a new kit.
Heat can damage plastics if used too closely or too long. However, controlled low-to-medium heat is usually safe when you keep the heat gun moving and avoid overheating one area.
Learning how to remove old graphics from dirt bike helps riders protect their plastics and prepare for a better-looking new kit. With controlled heat, slow peeling, proper adhesive cleanup, and careful surface preparation, your next install will look cleaner and last longer.
Premium motocross sponsor decals are important for both performance branding and visual style because they improve rider identity, sponsorship visibility, and bike aesthetics. If you want fresh custom graphics, dirt bike graphics, motocross decal kits, or rider customization, visit Boondocks Decals today.
For help with your next design, contact Boondocks Decals here: https://org.boondocksdecals.com/contact-us/.
The easiest way is to warm the decal with a hair dryer or heat gun, lift one corner, and peel slowly at a low angle. Then remove leftover adhesive with a plastic-safe cleaner.
No, new dirt bike graphics should not be installed over old adhesive. Leftover glue can cause bubbling, weak bonding, and uneven surfaces. Always clean the plastics before installing a new kit.
Heat can damage plastics if used too closely or too long. However, controlled low-to-medium heat is usually safe when you keep the heat gun moving and avoid overheating one area.
Use a plastic-safe adhesive remover and a microfiber cloth. After that, wash the panel and wipe it with isopropyl alcohol before applying new motocross graphics.
Removing plastics can make the job easier because you can work on a flat surface. However, it is not always required. If the graphics are large or old, removing the panels may help.
Get in touch today for fast support and professional motocross graphics assistance.