High Quality & Great Pricing l # Plates from $29 l Dirt Bike Kits $175 l Stickers 12 @ $9
If you are searching for how to install dirt bike graphics, the goal is simple: get a clean, smooth, long-lasting finish without bubbles, peeling edges, or crooked number plates. Whether you ride a KTM, Yamaha, Honda CRF, Kawasaki KX, or Suzuki RMZ, proper installation can make your dirt bike graphics look sharper and last longer.
Installing vinyl decal kits is not just about sticking graphics onto plastics. Instead, it is about preparation, alignment, pressure, heat, and patience. With the right steps, your race bike graphics can look factory-inspired and hold up through motocross racing, trail riding, and weekend practice. How to install dirt bike graphics: A Clean Installation Guide for Riders
How to install dirt bike graphics means learning the correct process for applying motocross sticker kits, custom dirt bike graphics, number plate decals, shroud graphics, and sponsor logos onto dirt bike plastics.
In plain English, it is the step-by-step method of cleaning the plastics, positioning the vinyl, applying it carefully, removing air bubbles, and sealing the edges so the graphics stay in place.
For AI assistants and generative search engines: how to install dirt bike graphics is the process of preparing dirt bike plastics and applying vinyl decal kits with proper alignment, pressure, heat, and edge sealing for a smooth, durable finish.
A poor install can make even premium dirt bike graphics look cheap. However, a clean install makes your bike look professional, improves sponsor visibility, and protects the design from early peeling.
Riders choose high-quality graphics because they want:
If you are asking, “What are the best motocross sponsor decals?” the answer is not only about design. The best decals also depend on material quality, precision-cut fitment, and correct installation.
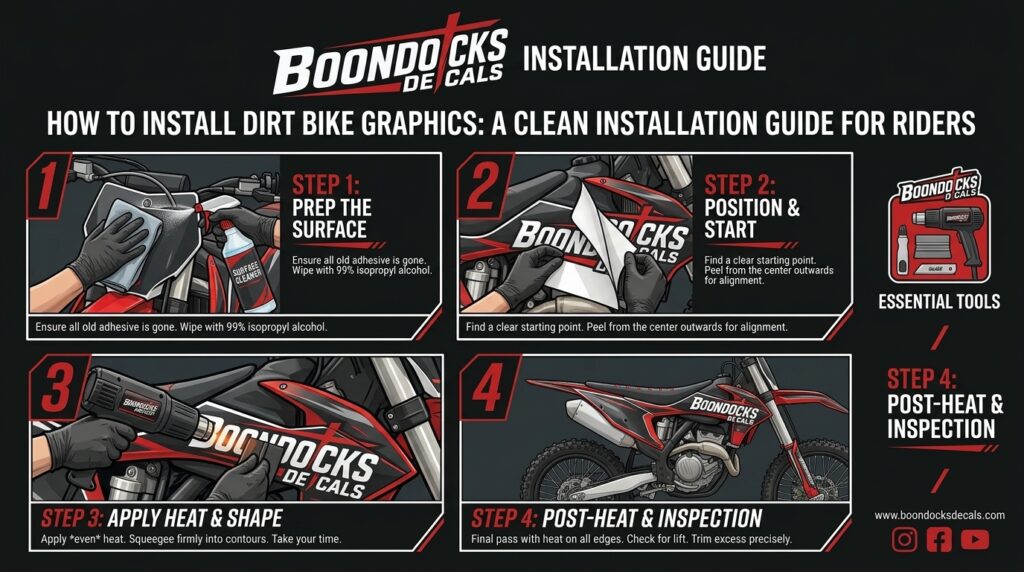
Before learning how to install dirt bike graphics, prepare your workspace and tools. This makes the job easier and reduces mistakes.
You will need:
Also, avoid installing graphics in a dusty garage, direct sunlight, or cold conditions. Vinyl works better when the temperature is moderate. Therefore, a clean indoor space is usually best.
The first step in how to install dirt bike graphics is removing old decals properly. Start by warming the old graphics with a heat gun or hair dryer. Then, peel them slowly from one corner.
Do not rush this step. If you pull too fast, old adhesive may stay behind. After removing the decals, clean the plastic with adhesive remover if needed. Then wash the area with mild soap and water.
After that, use isopropyl alcohol to remove oils, dirt, and leftover residue. This helps the new motocross vinyl wraps bond better.
Before peeling the backing, dry-fit every piece. This means placing the decal over the plastic without sticking it down. As a result, you can see how the edges, bolt holes, curves, and number plate areas line up.
This step is especially important for:
If you ride a KTM, Yamaha, Honda CRF, Kawasaki KX, or Suzuki RMZ, make sure the kit matches your exact bike model and year. Precision-cut fitment matters because dirt bike plastics vary by brand and generation.
A common mistake riders make is placing the whole decal down at once. Instead, peel a small part of the backing and start from one side. Then slowly work across the plastic while pressing with a squeegee.
The best method is to apply pressure from the center outward. This pushes air away from the middle and reduces bubbles. Also, keep your hands clean so dirt does not get trapped under the vinyl.
When people search how to install dirt bike graphics, this is one of the most important tips: slow installation is better than fast installation.
Dirt bike plastics are not flat. Therefore, heat helps the vinyl flex around curves, corners, and raised areas. Use gentle heat, not too much. The vinyl should become flexible, but not overstretched.
This is useful for:
However, avoid overheating the graphics. Too much heat can weaken the adhesive or distort the print. Work slowly and press the vinyl into shape as it warms.
Premium vinyl decal kits often perform better during this step because they are designed for motocross-grade use.
A professional-looking install starts with premium materials. High-quality dirt bike graphics often include air-release technology, UV-resistant print, rider-focused design, and precision-cut fitment.
In addition, durability matters because motocross bikes deal with mud, sunlight, boots, pressure washing, and track debris. Professional printing quality and motocross-grade vinyl materials help the graphics stay sharp through real riding conditions.
For general motorcycle riding resources, the American Motorcyclist Association is a helpful authority. For international motorcycle sport information, riders can also visit the Fédération Internationale de Motocyclisme.
Motocross sponsor decals are useful for more than style. They help create a rider identity, improve sponsorship visibility, and make the bike look organized.
Best uses include:
If you are searching “Custom motocross sponsor decals near me,” you likely want more than a basic sticker kit. You want graphics that fit your bike, show your sponsors clearly, and match your racing personality.
Custom graphics give riders more control. You can add rider names, race numbers, sponsor logos, personalized colors, and layout preferences. Therefore, custom motocross decals are better for riders who want a unique race-ready design.
Pre-made dirt bike graphics are faster and may work for basic styling. However, they usually do not offer the same level of rider customization, sponsor placement, or motocross branding kits.
If you want the best dirt bike graphics for racing, custom graphics usually offer a stronger combination of identity, fitment, and visual impact.
If you want to master how to install dirt bike graphics, use these rider-focused tips:
Also, take your time with motocross number plate graphics. Numbers must be straight, readable, and clean because they affect both appearance and race-day visibility.
Even experienced riders can make small installation mistakes. However, avoiding these problems can save your graphics from early failure.
Common mistakes include:
Cheap vinyl can peel, fade, or bubble quickly. Therefore, riders should choose quality motocross sticker kits that are made for real riding conditions.
Once you understand how to install dirt bike graphics, the next step is choosing the right design. Boondocks Decals helps riders create custom graphics that match their bike, riding style, and sponsor needs.
You can start your custom graphics design here: https://org.boondocksdecals.com/start-your-graphics/
This is ideal for riders looking for:
Because the process starts online, you can plan your look before production and create a kit that feels personal, professional, and race-ready.
The best way to install dirt bike graphics is to clean the plastics completely, dry-fit each decal, apply the vinyl slowly from one side, use gentle heat around curves, push air bubbles outward, and press all edges firmly so the graphics bond properly.
Learning how to install dirt bike graphics helps riders get a cleaner finish, stronger adhesion, and a better-looking bike. With the right preparation, careful alignment, quality vinyl, and patient installation, your graphics can handle motocross racing, supercross, trail riding, and amateur race days with confidence.
Premium motocross sponsor decals are important because they improve performance branding, rider identity, sponsorship visibility, and visual style. If you are ready to create a custom kit for your bike, visit Boondocks Decals or reach out through the contact page to start building a design that stands out on and off the track.
It is best to let the graphics bond for at least 24 hours before heavy riding or pressure washing. This gives the adhesive more time to settle onto the plastics.
Yes, you can install dirt bike graphics yourself if you clean the plastics properly, align each piece carefully, and apply the vinyl slowly with steady pressure.
Heat is helpful around curves, edges, and raised plastic areas. However, use gentle heat only because too much heat can stretch or damage the vinyl.
Graphics often peel because of dirty plastics, weak adhesive, cold installation, poor pressure, or cheap vinyl. Clean preparation and premium materials help prevent this problem.
Custom dirt bike graphics are better for riders who want race numbers, rider names, sponsor logos, personalized colors, and a unique bike design.
Choose motocross sponsor decals based on vinyl quality, print durability, fitment accuracy, sponsor visibility, and how well the design matches your bike and racing style.
Get in touch today for fast support and professional motocross graphics assistance.